
 KSh KES
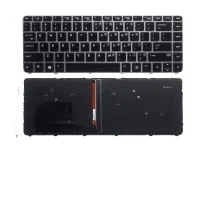
Description
Replacing the HP 840 G3/G4 keyboard is a routine repair. First, gather your necessary tools. You will require a small Phillips head screwdriver. A plastic spudger proves very useful too. Also, prepare a clean, static-free workspace.
Step One
Begin by completely powering off your laptop. Disconnect the AC power adapter. Next, remove the battery pack. This prevents any accidental electrical issues. Locate the screws on the laptop’s bottom. Carefully loosen all visible fasteners. Some screws might be cleverly hidden. Check under rubber feet or small labels. Keep track of each screw’s exact location. A magnetic mat helps organize them well.
Step Two
Now, flip the laptop over gently. Open the display panel fully. You need to remove the top cover assembly. This panel frames the keyboard. Gently pry it up using the plastic spudger. Start from a side edge. Work your way around slowly and deliberately. Be careful with internal plastic clips. They can break easily if forced. Once loose, carefully lift the cover away. Disconnect any attached ribbon cables. These usually connect the touchpad.
With the top cover now removed, the keyboard is visible. You will see several tiny screws. These fasteners secure the keyboard in place. Unscrew all of these small components. Take care not to damage the screw heads. Some models also have retention clips. Gently release these small clips. Carefully lift out the old keyboard. It will have a ribbon cable attached. This cable connects to the main motherboard.
Step Three
Next, disconnect the keyboard’s ribbon cable. It connects via a small ZIF connector. Gently flip up the tiny retaining bar. Then, the cable slides out smoothly. Remove the old, malfunctioning keyboard. Now, prepare your new replacement keyboard. Ensure it is the correct model number. Check for any bent or damaged pins. Carefully insert the new ribbon cable. Push it fully into the ZIF connector. Gently flip down the retaining bar. Ensure it is securely latched.
Finally
Position the new keyboard precisely. Align it correctly within the laptop frame. Replace all the small keyboard screws. Tighten them just enough to secure. Do not overtighten them. Reattach the laptop’s top cover. Ensure all plastic clips snap into place. Reconnect the touchpad ribbon cable. Flip the laptop over carefully. Reinstall all the bottom screws. Place them back in their original positions. Finally, insert the battery. Connect the AC adapter. Power on your laptop system. Test the new keyboard thoroughly. Type on every single key. Check all special function keys. Confirm proper operation of all features. This successfully completes the replacement task. Enjoy your fully functional new keyboard!
Our Facebook Page


Reviews
There are no reviews yet.